How to Install Chain Link Fence on a Slope
Below is a step by step guide on how to install chain link fence on a slope using two different methods.
- Experience Required: Medium-High
- Tools Required: Protective gloves, Level, Tape measure, String line, Post hole digger, Shovel, Fence stretcher tool, Bolt cutter (for bias cuts)
- Materials Required: Chain link fence, Fence posts, Tension bars, Tension bands, Top rails and caps, Fence ties, Bolts and nuts, Concrete
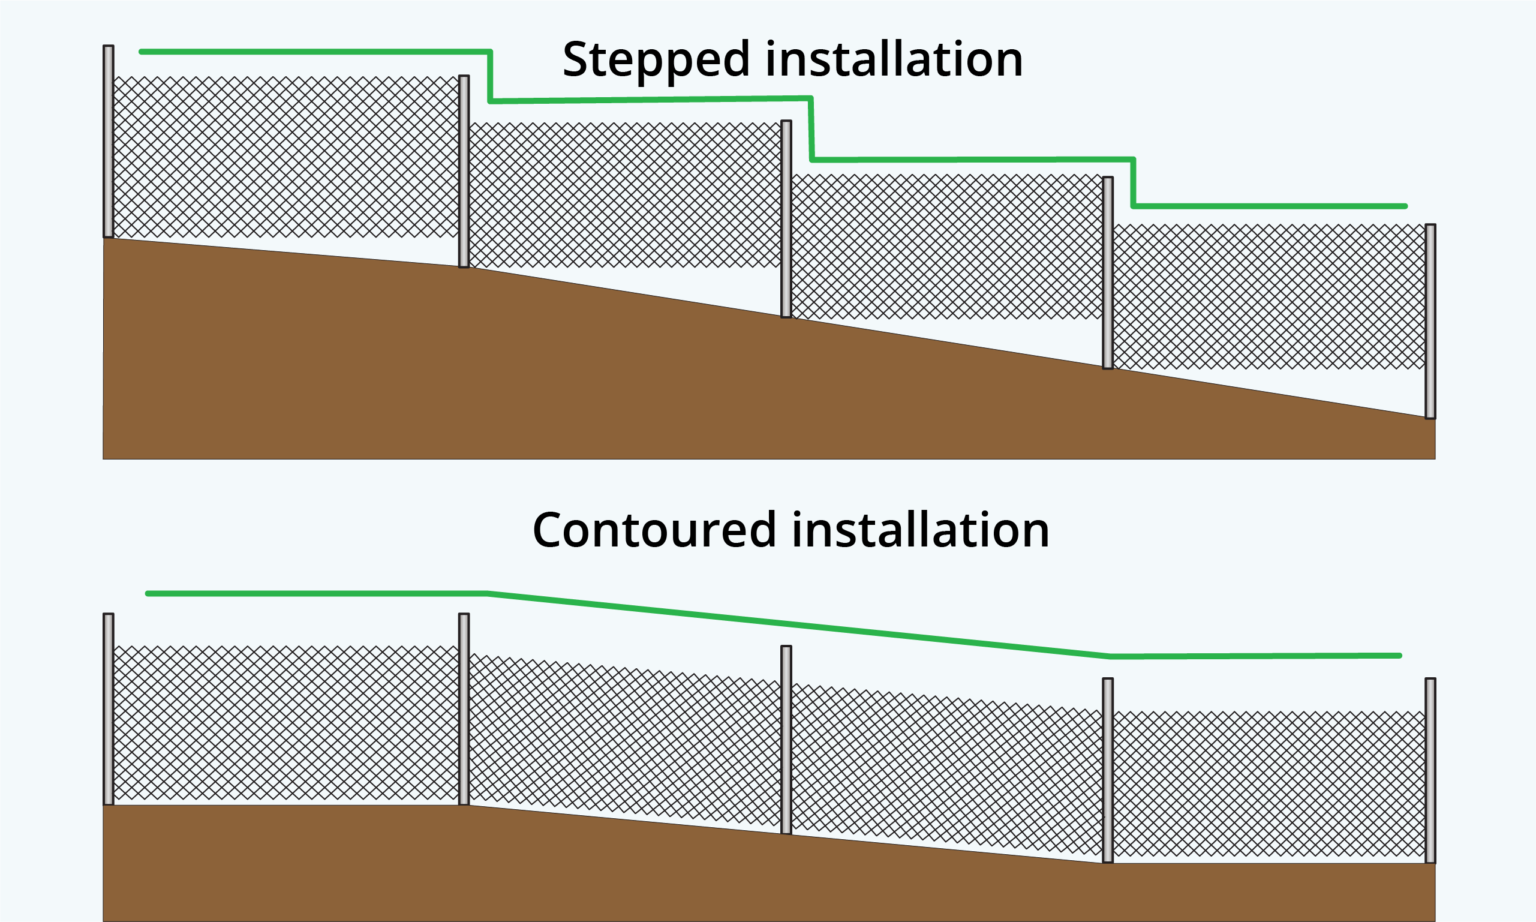
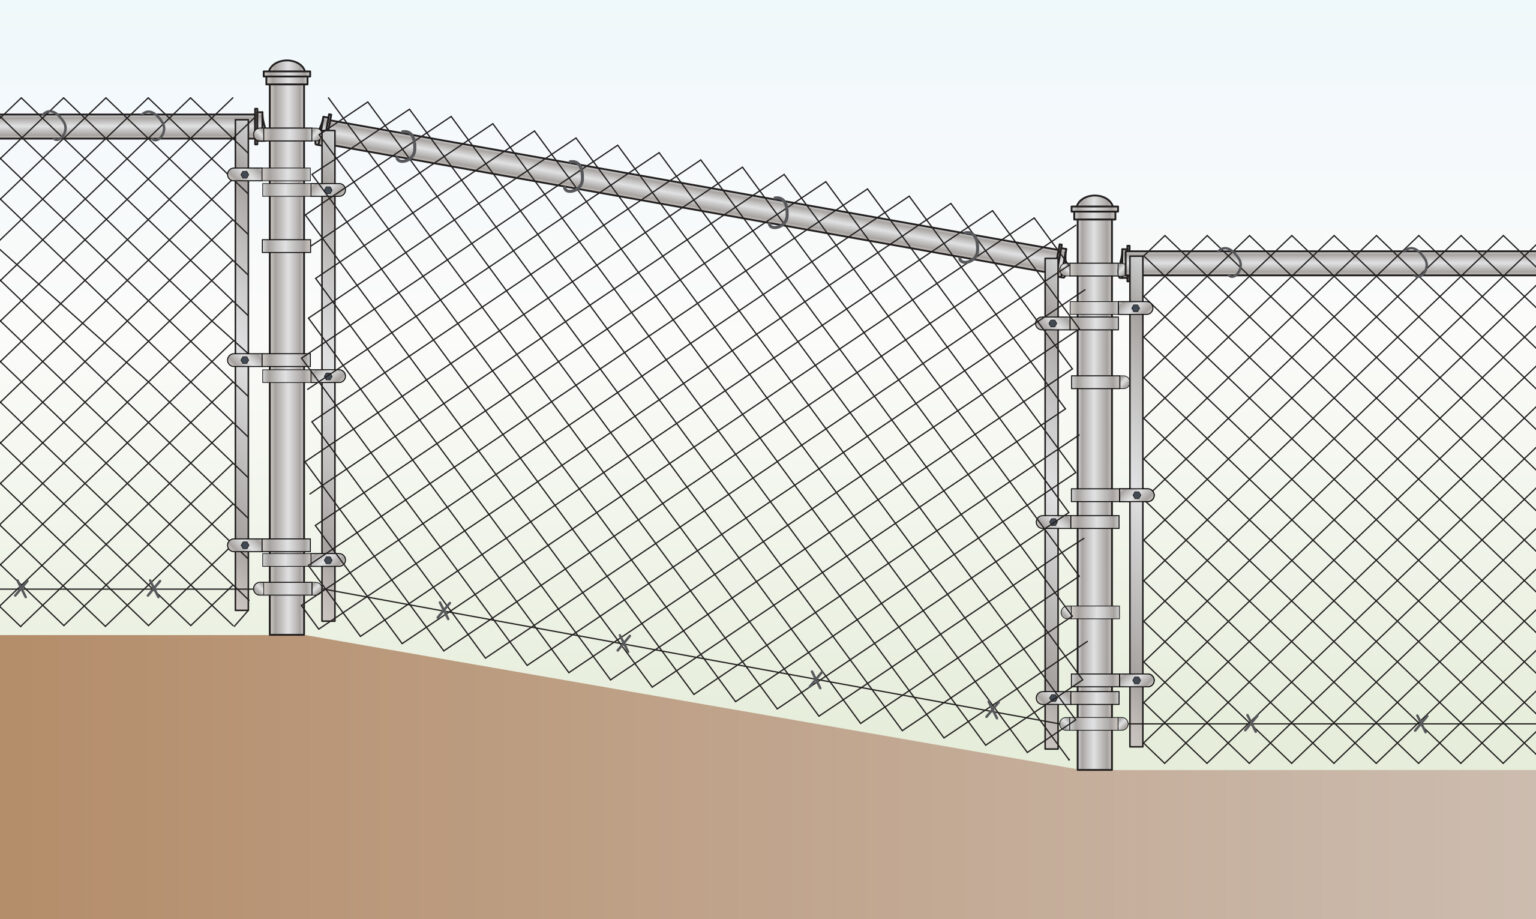
STEPPED
Introduction
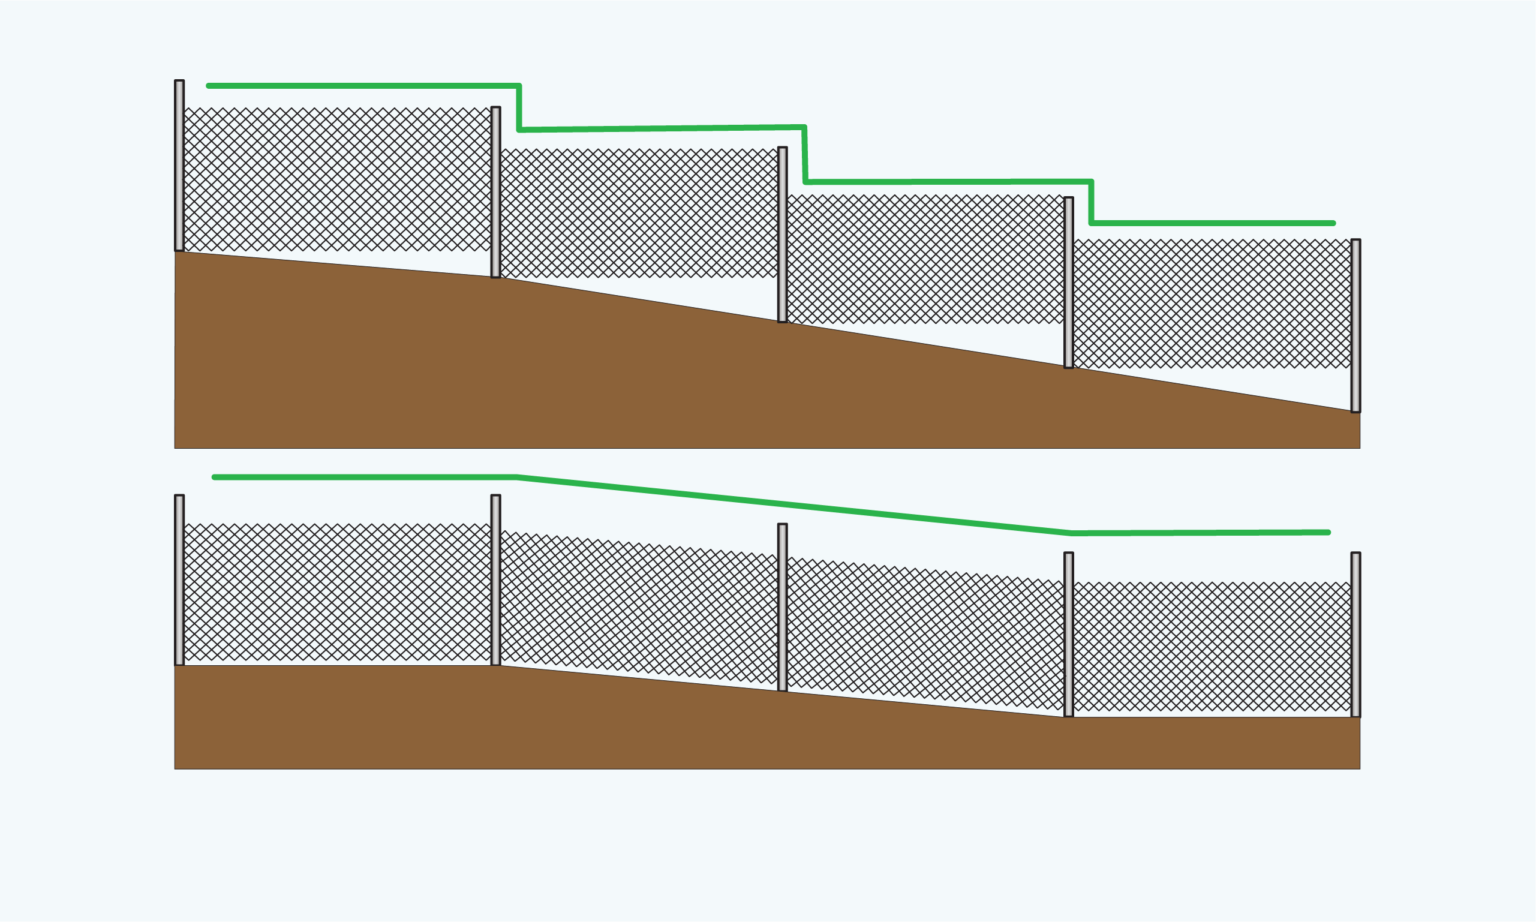
- For steep slopes, a stepped installation might be more effective.
- Pro: It’s simpler and easier to plan and construct.
- Con: The gaps beneath the mesh could permit animals or debris to pass through.
Step 1) Preparation
- Use string and stakes or spray paint to outline the location where the fence will be set up.
- Clear the space by removing obstacles such as rocks and debris.
- Use a shovel to level minor inclines or uneven areas.
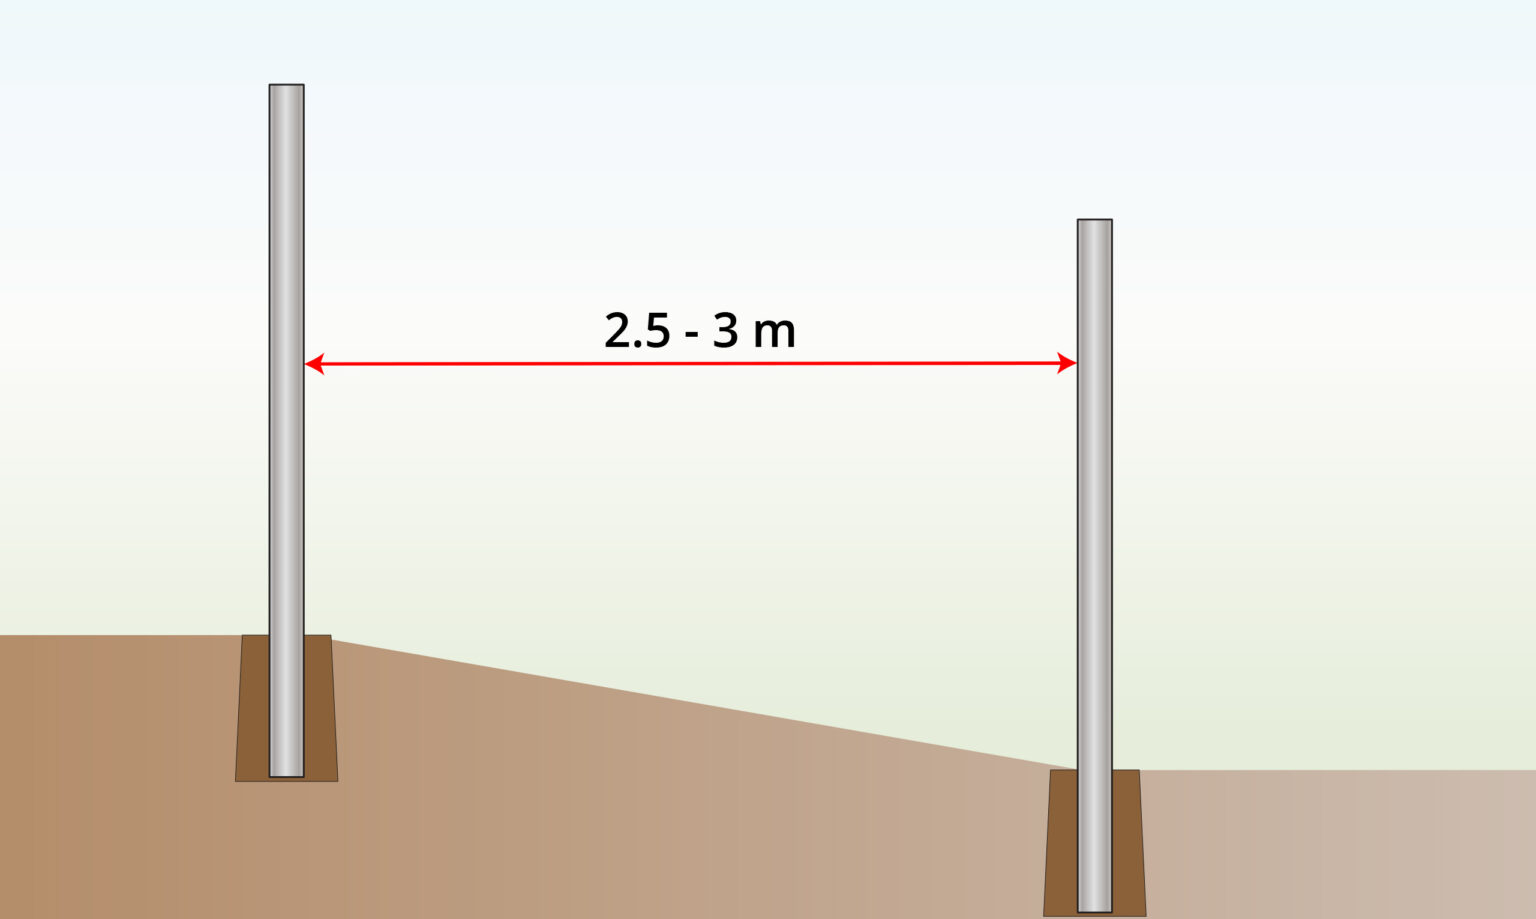
Step 2) Set Posts
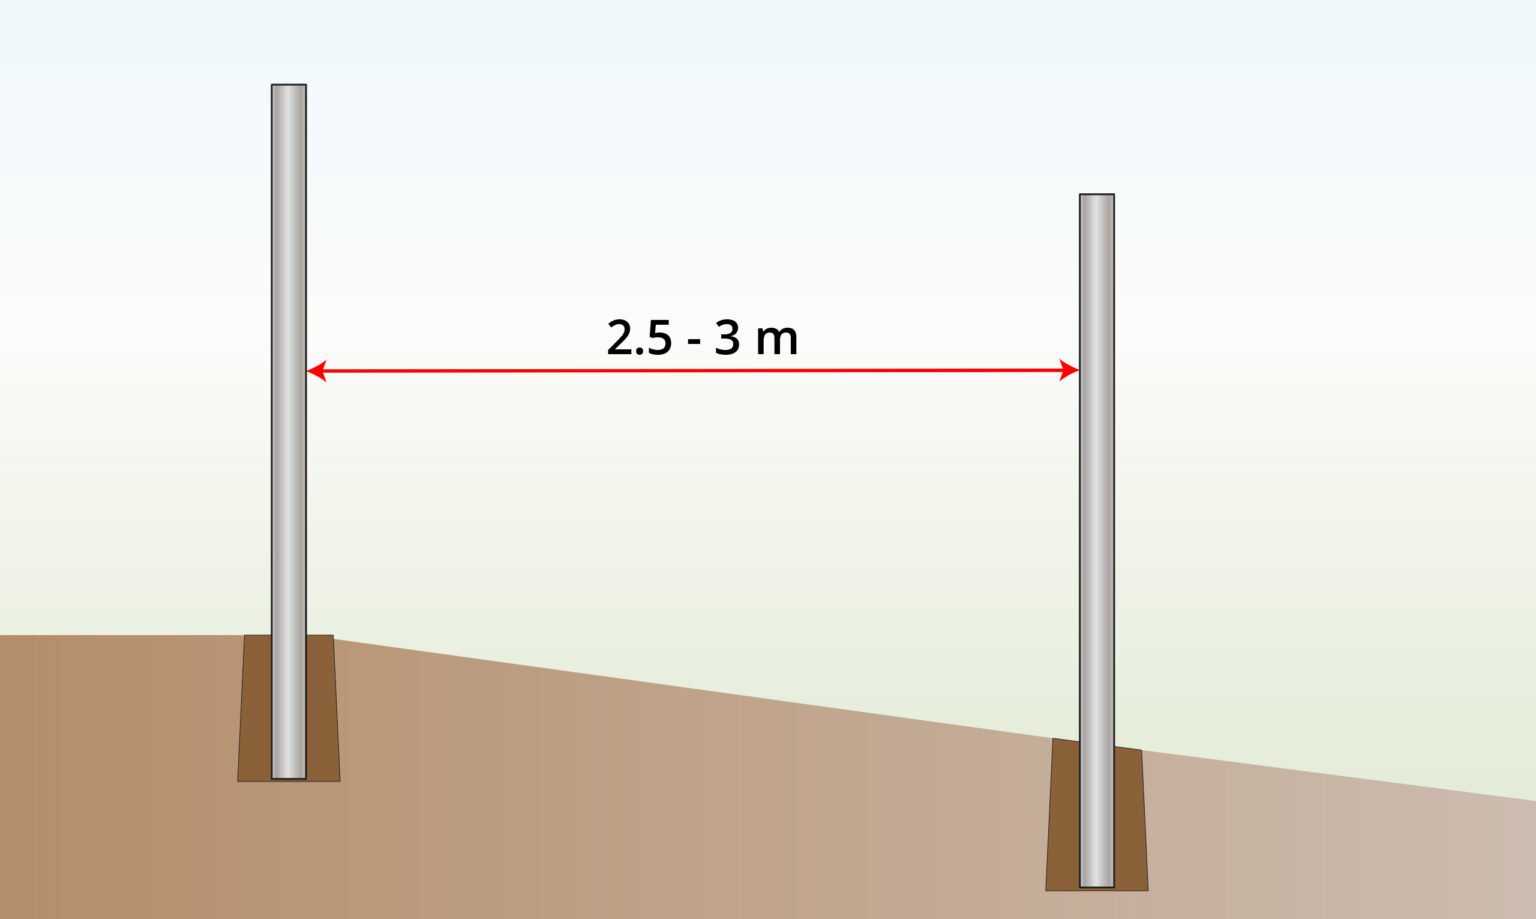
- Mark the post locations, spacing them 2.5-3 meters apart, and adjust the spacing as needed for the slope.
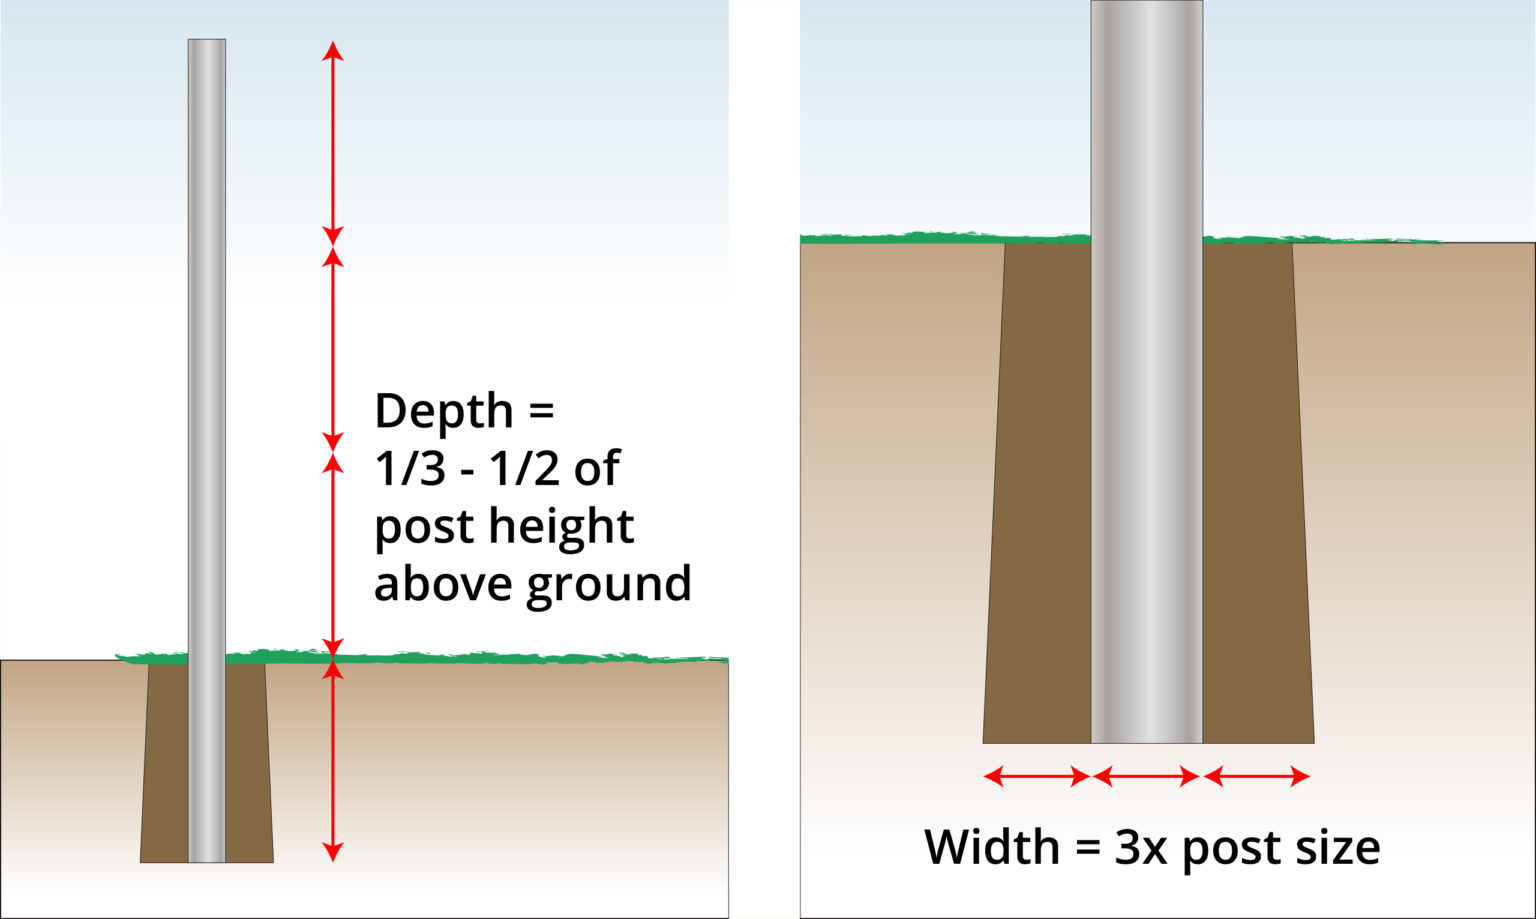
- Dig post holes using a post hole digger, making them deeper on the downslope side for added stability.
- Use concrete to secure the posts, ensuring they are vertically straight and horizontally level.
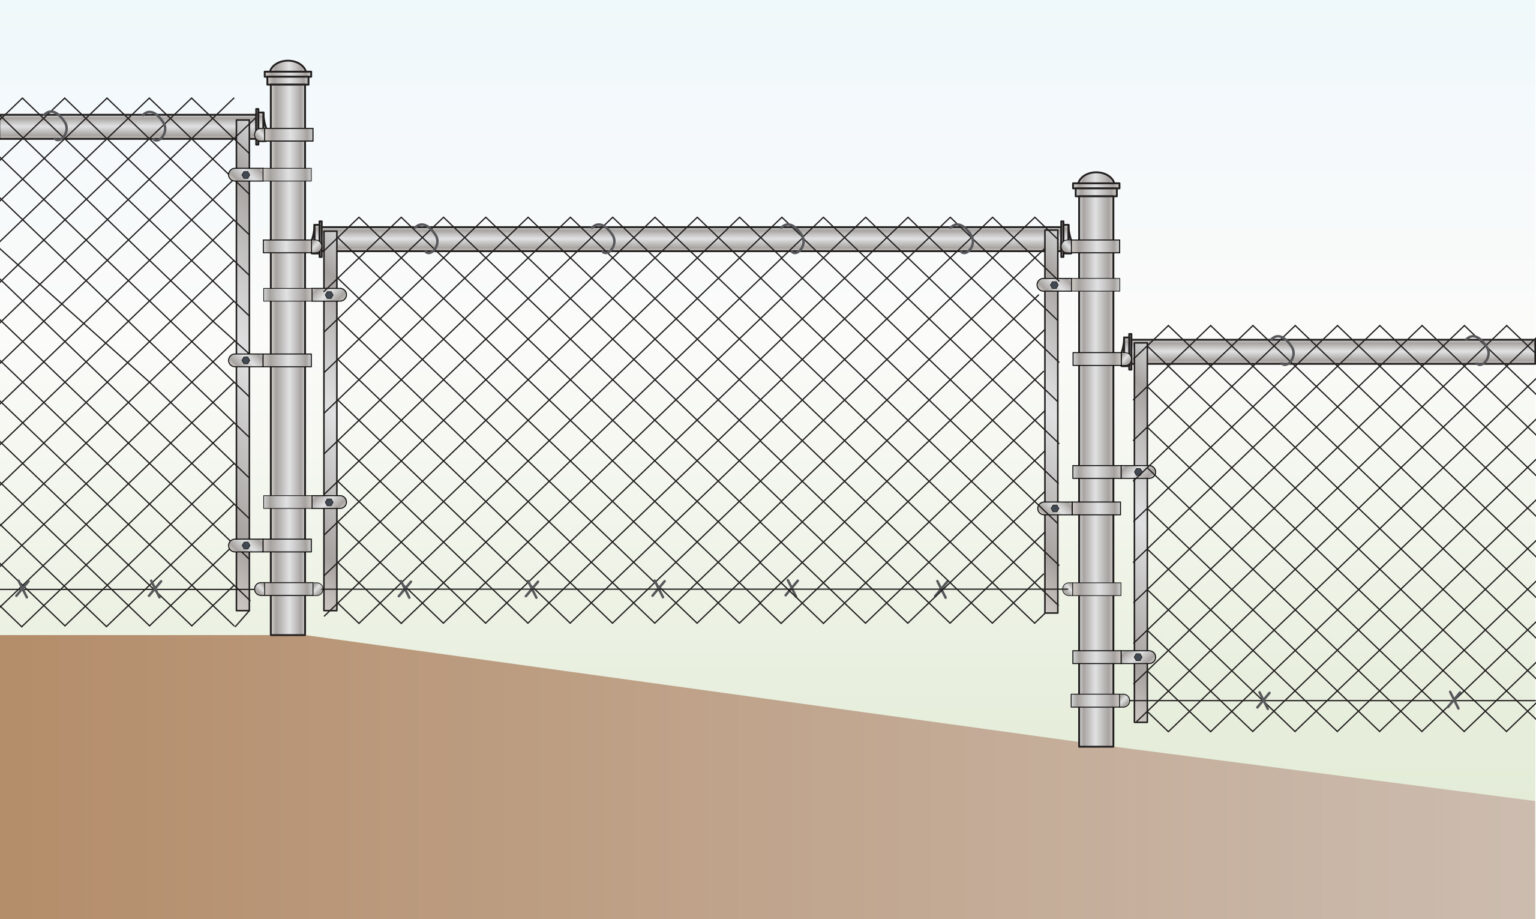
Step 3) Add Tension Bands
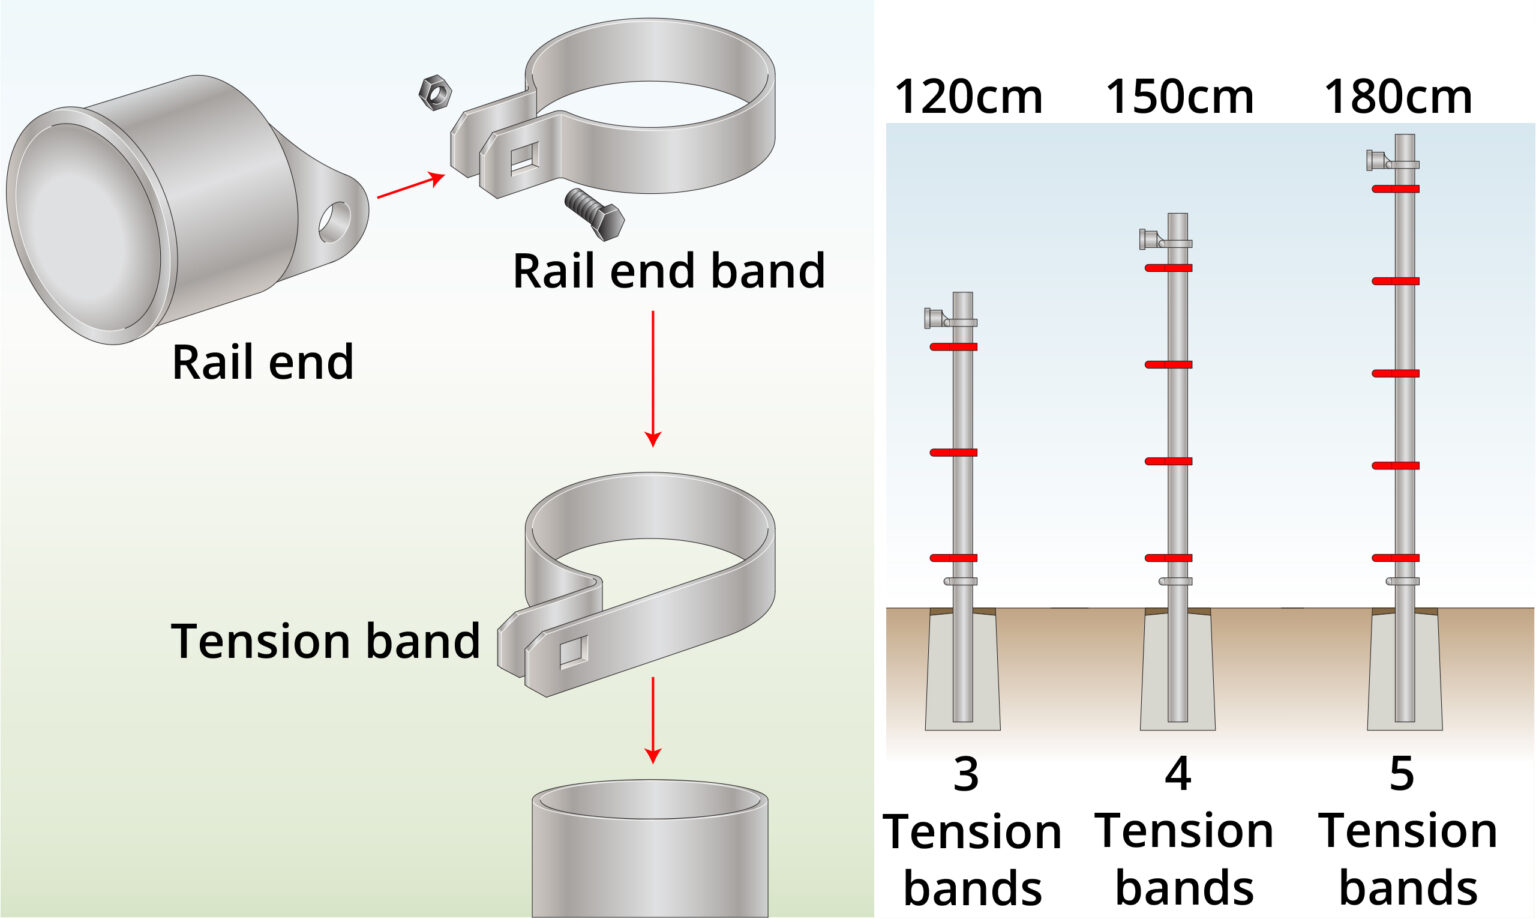
- Add tension bands to all posts ensuring the flat side faces outward.
- Adjust the number of bands as needed based on the barrier’s height: taller posts will require more bands.
Step 4) Secure Caps and Top Rail
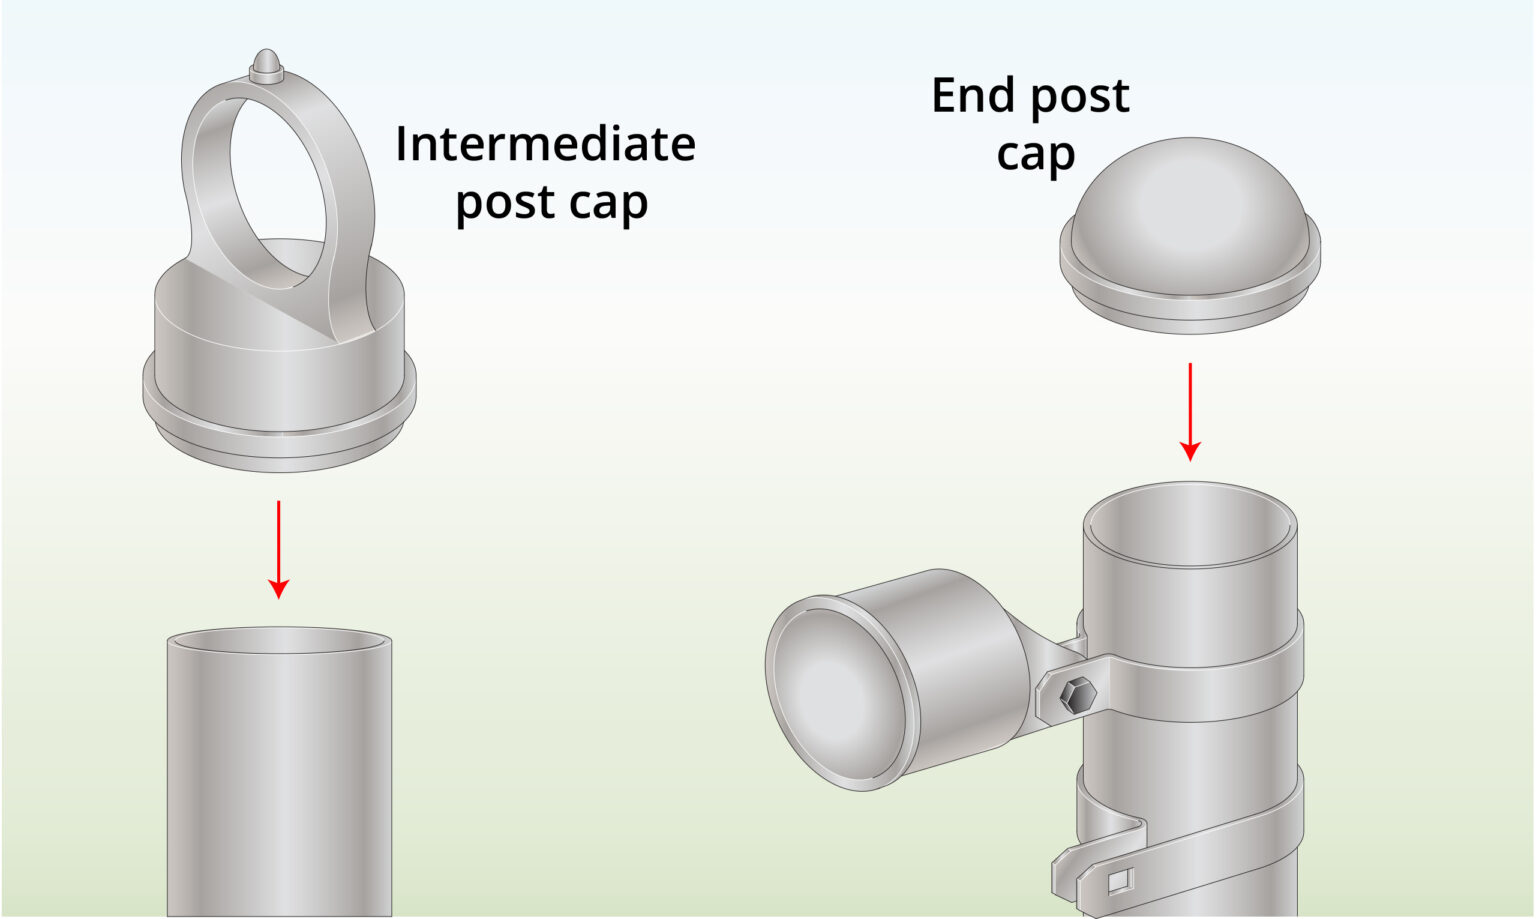
- Attach the caps on all posts: use caps with loops for intermediate posts and without loops for end posts.
- Tighten all nuts and bolts, leaving some slack for later adjustments.
- Finally, attach the top rail.
Step 5) Attach Chain Link
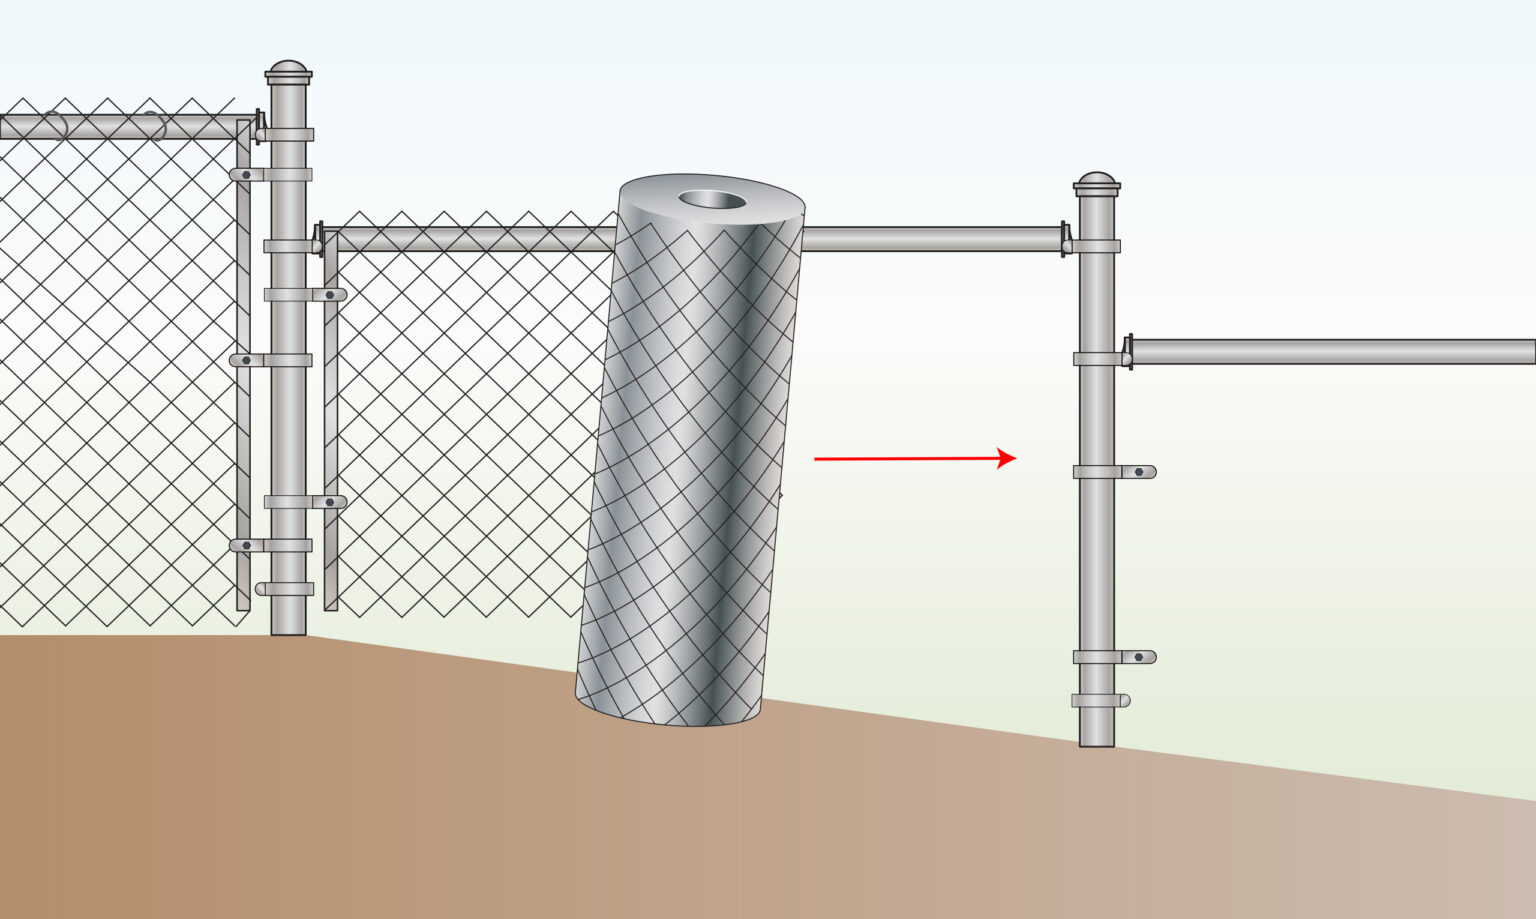
- Stretch the mesh roll tightly along the line, working section by section (post to post).
- Start at one end, securing the fabric with tension bars and bands. and unrolling it along the posts.
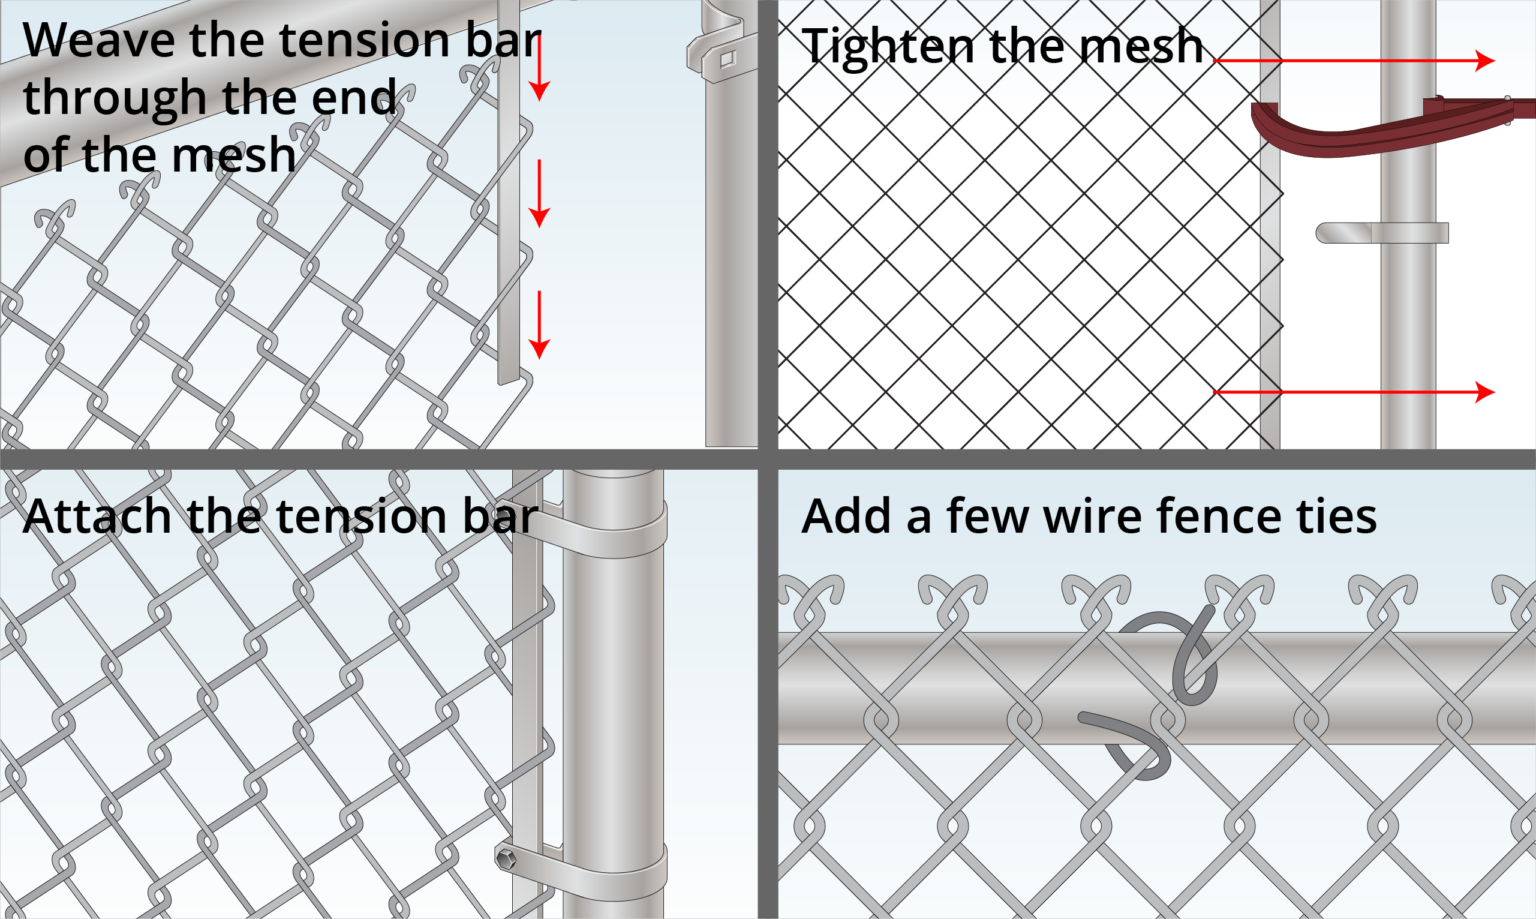
- Weave the tension bar through the mesh, use a stretcher to tighten if needed.
- Then, attach it with tension bands and secure the mesh to the top rail with ties.
- For detailed step-by-step instructions, visit our blog.
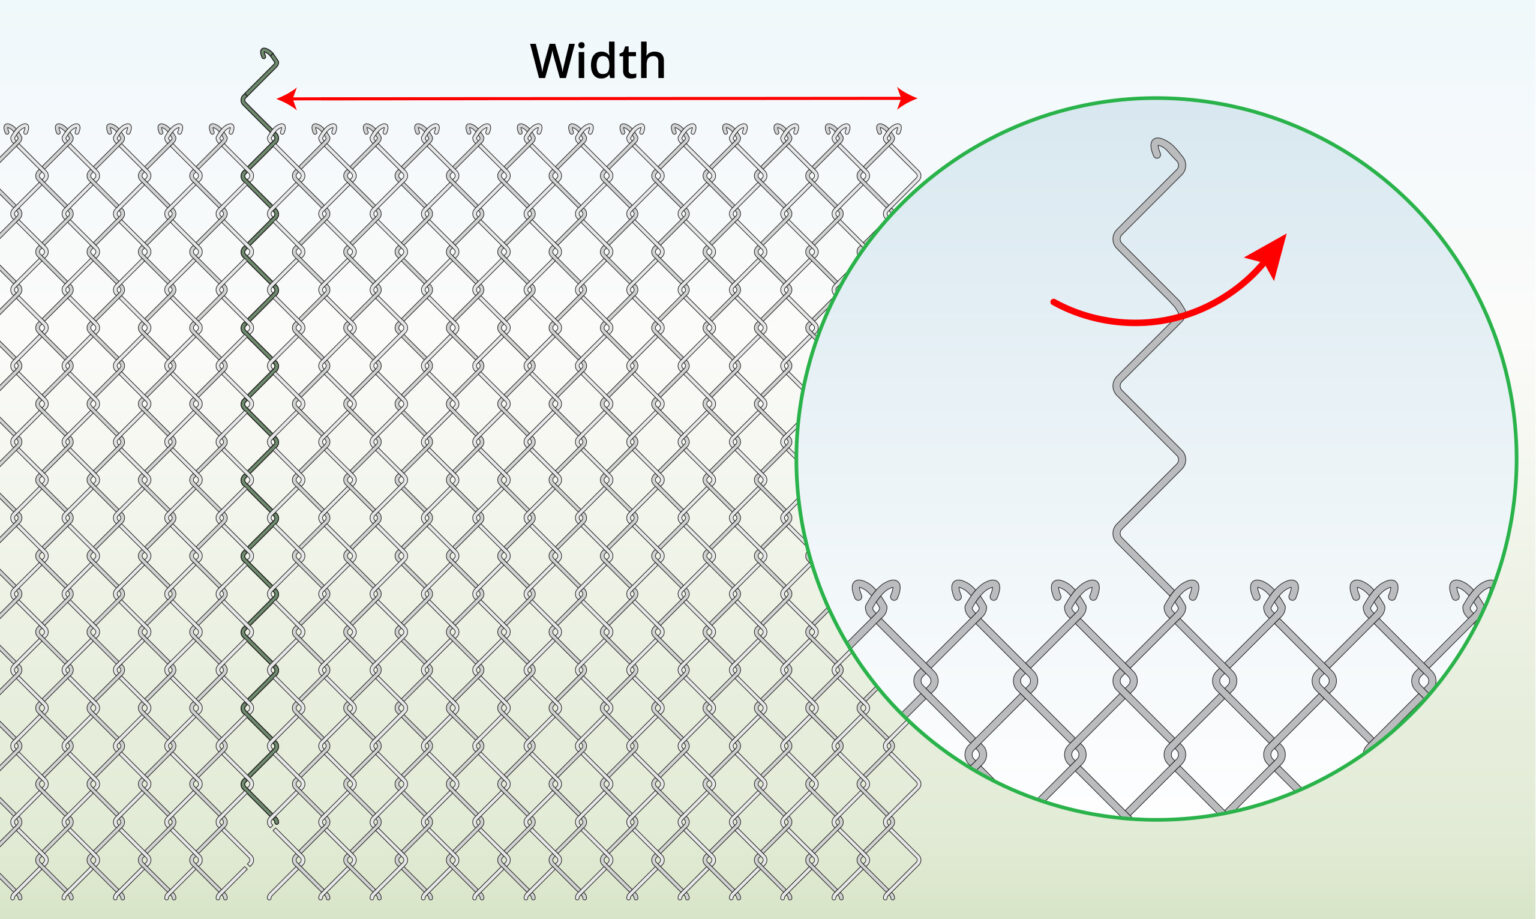
- To remove excess mesh, unravel a strand of wire.
Step 6) Optional: Thread Tension Wire
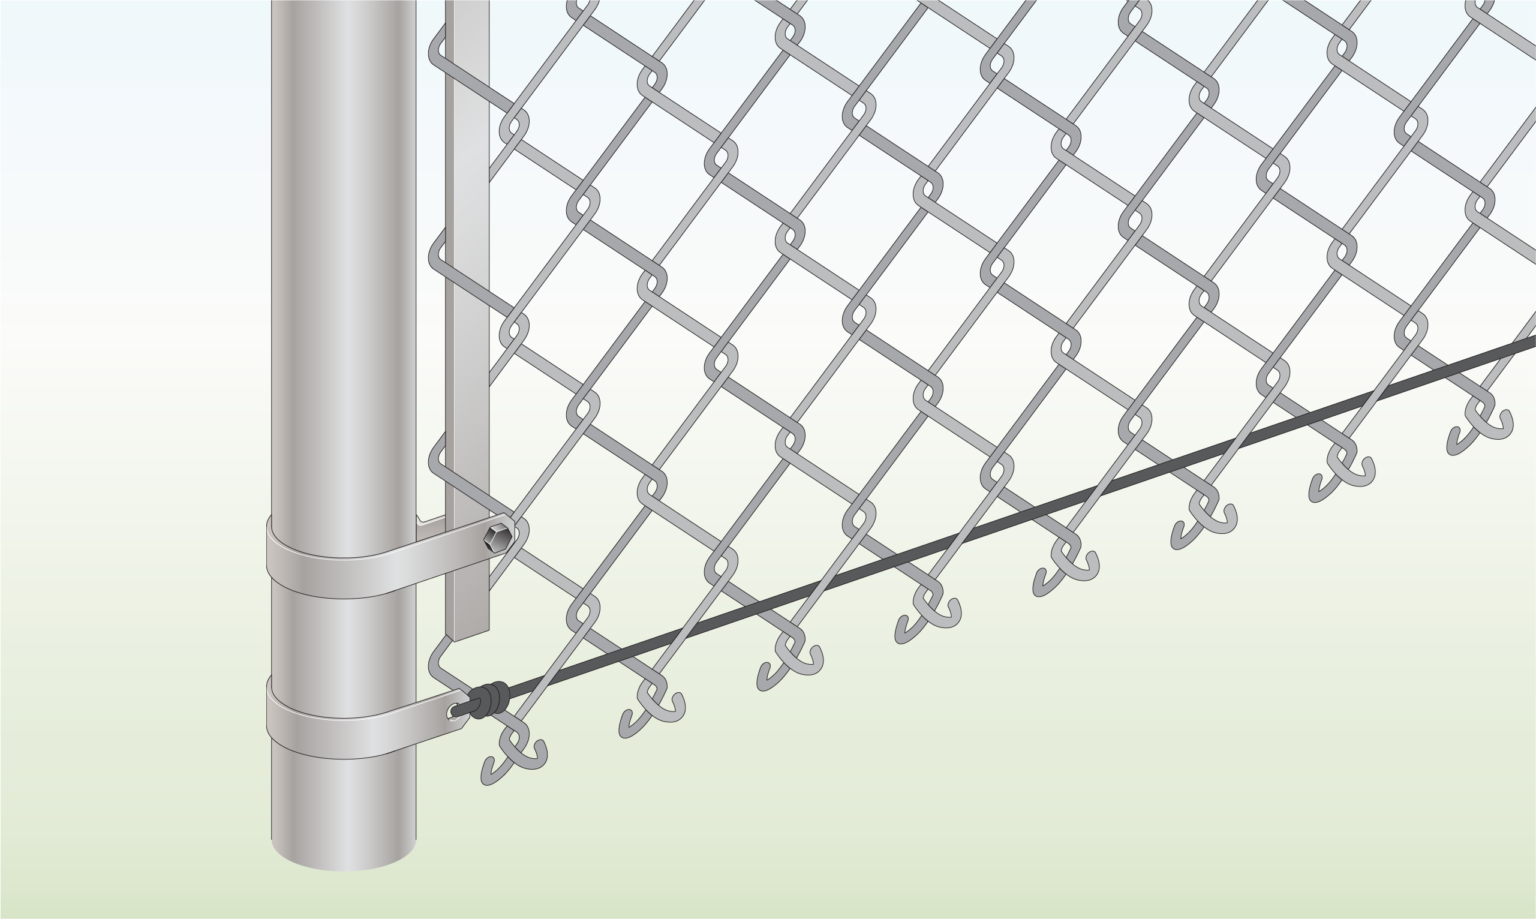
- Weave tension wire through the bottom of the mesh along the barrier’s length to prevent animals from getting under it.
Step 7) Repeat with Every Section
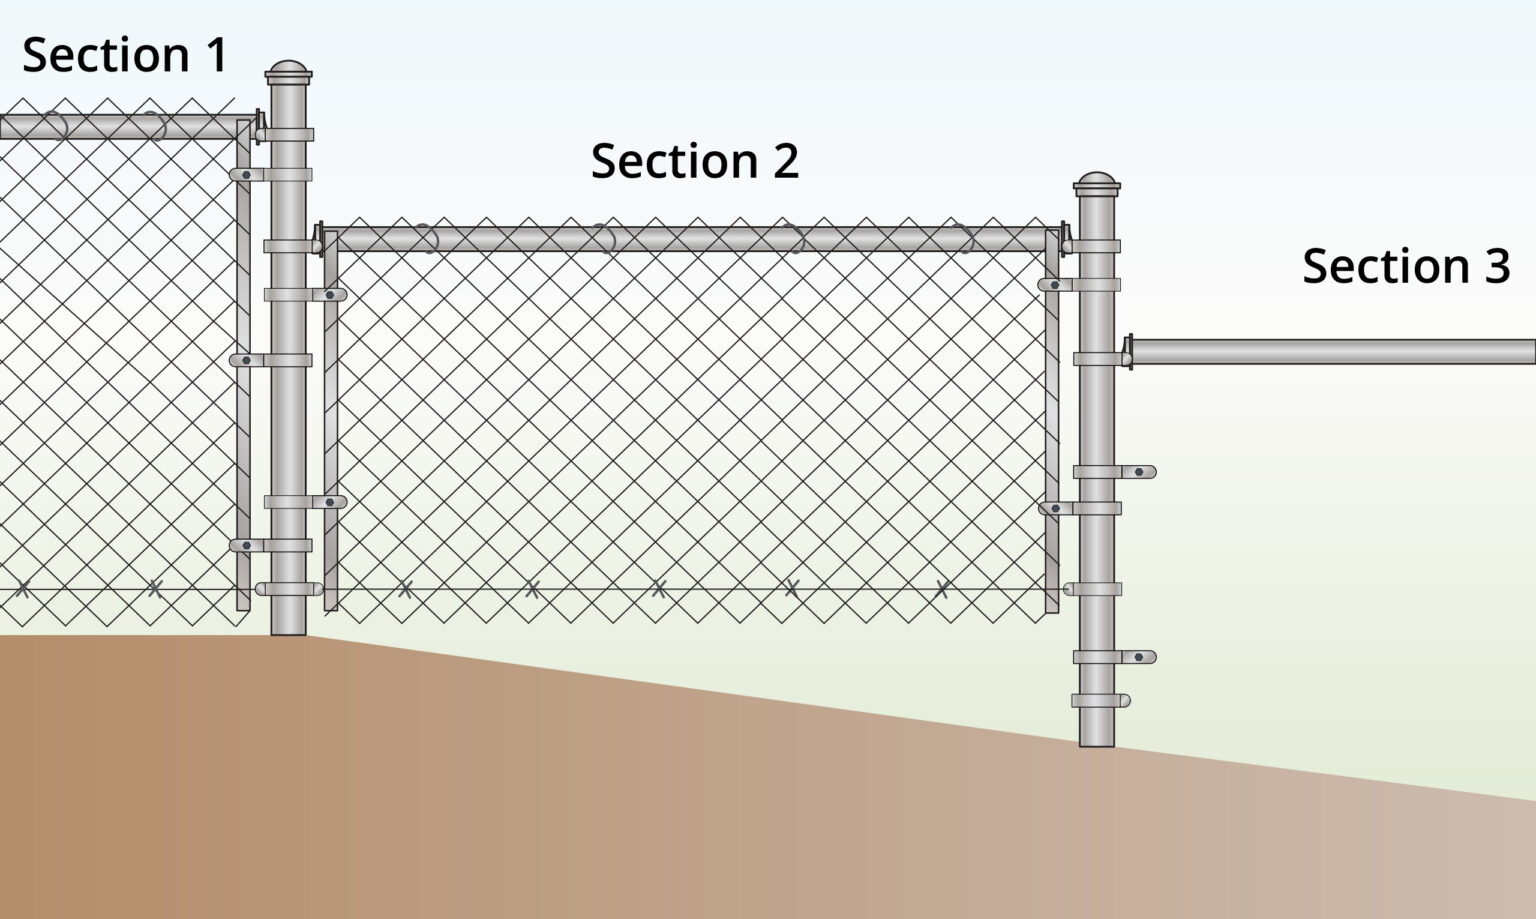
- In the process of how to install chain link fence on a slope, repeat these steps for each section.
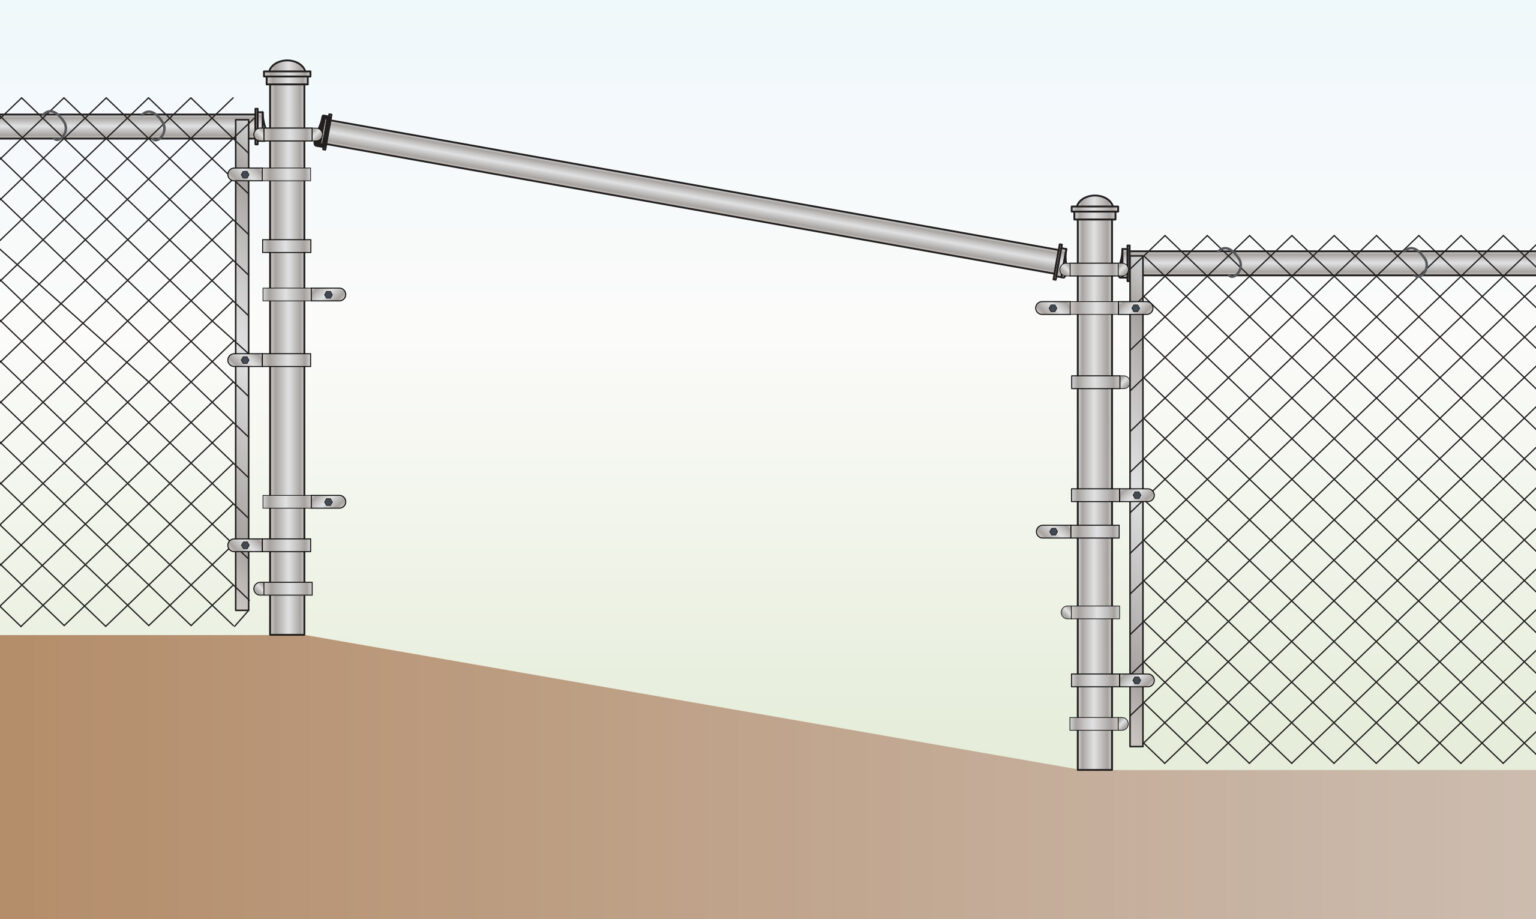
CONTOURED
Overview
- For a slight incline or slope, a contoured installation might be a better option.
- Pro: Provides a neat, visually appealing appearance without gaps.
- Con: Requires additional effort and precision, including careful cutting and alignment (for bias cut).
Step 1) Getting Ready
- Mark the barrier line using a string and stakes or spray paint.
- Prepare the ground: clear the line by removing rocks, shrubs, and debris.
- Level minor inclines or uneven areas using a shovel.
Step 2) Install Posts
- Determine the placement of the posts, spacing them 2.5–3 meters apart, and adjust the distance to accommodate variations in the incline.
- Dig the post holes, ensuring they are deeper on the downslope side to provide extra support.
- After placing the posts into the holes, secure them with concrete, ensuring they are perfectly upright and aligned horizontally for stability and uniformity.
Step 3) Attach Tension Bands
- Secure tension bands on each post, making sure the flat side is pointing to the outside of the enclosure.
- Increase the number of bands based on the post height; taller posts will need additional bands.
Step 4) Attach Caps and Top Rail
- Place the caps on all posts: use caps with loops for intermediate posts and those without loops for end posts.
- Begin tightening all nuts and bolts, but leave some slack for future adjustments.
- Next, attach the top rail.
Step 5) Secure Chain Link
- Begin by completing the flat sections first, as it’s easier to put up the horizontal areas before tackling the uneven sections.
- Weave the tension bar through the mesh, using a stretcher to tighten it if necessary.
- Next, attach the mesh with tension bands and secure it to the top rail using fence ties.
- For detailed instructions, check our blog here.
- To remove excess mesh, unravel a strand of wire from the mesh.
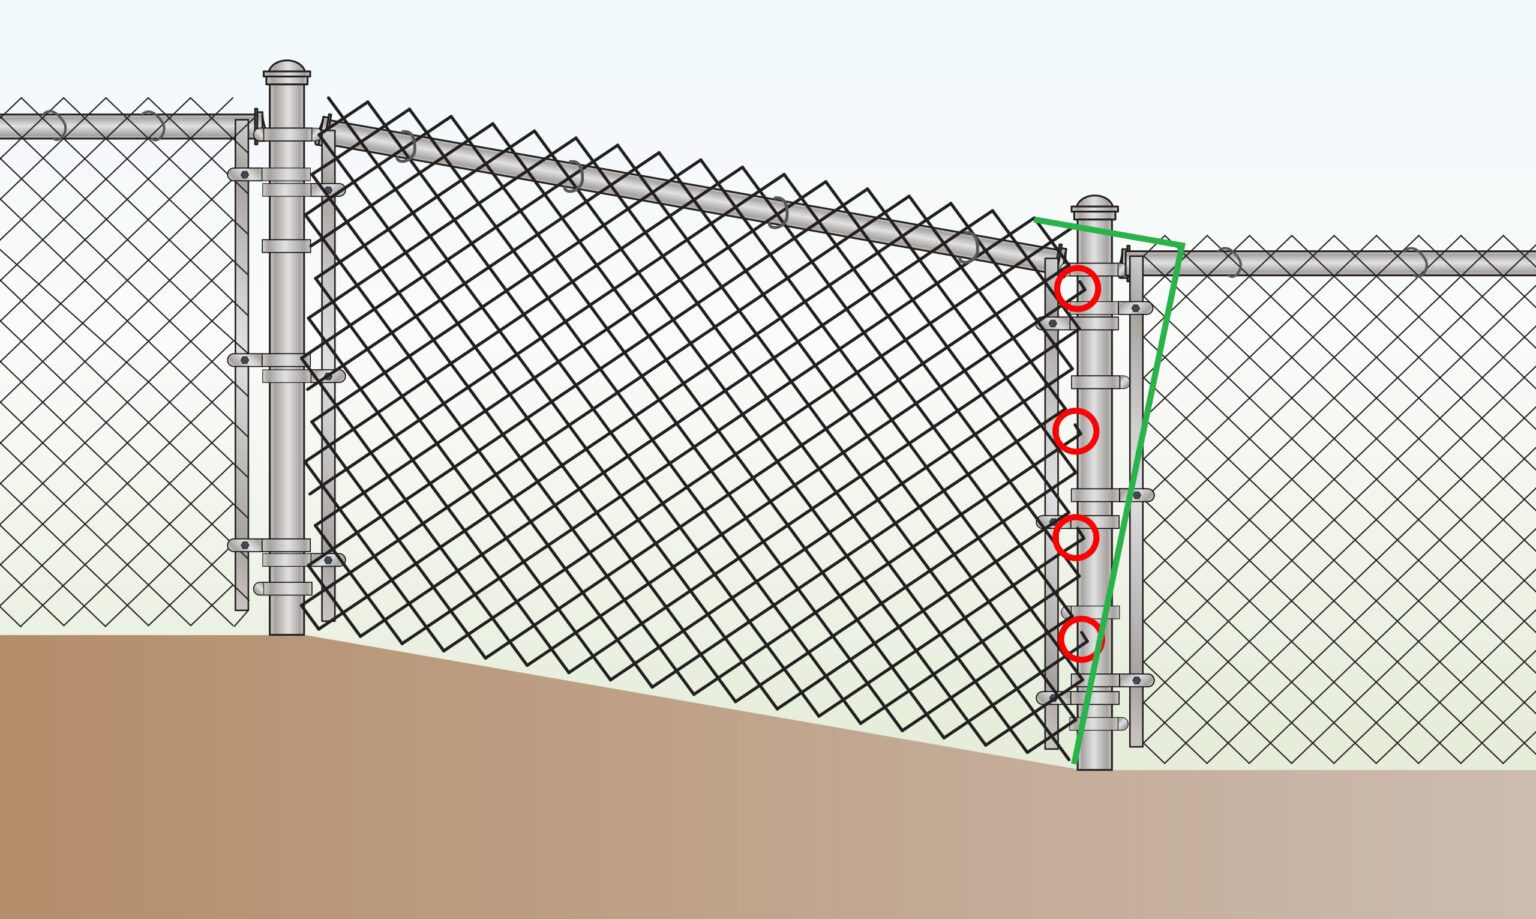
Step 6) Bias Cut
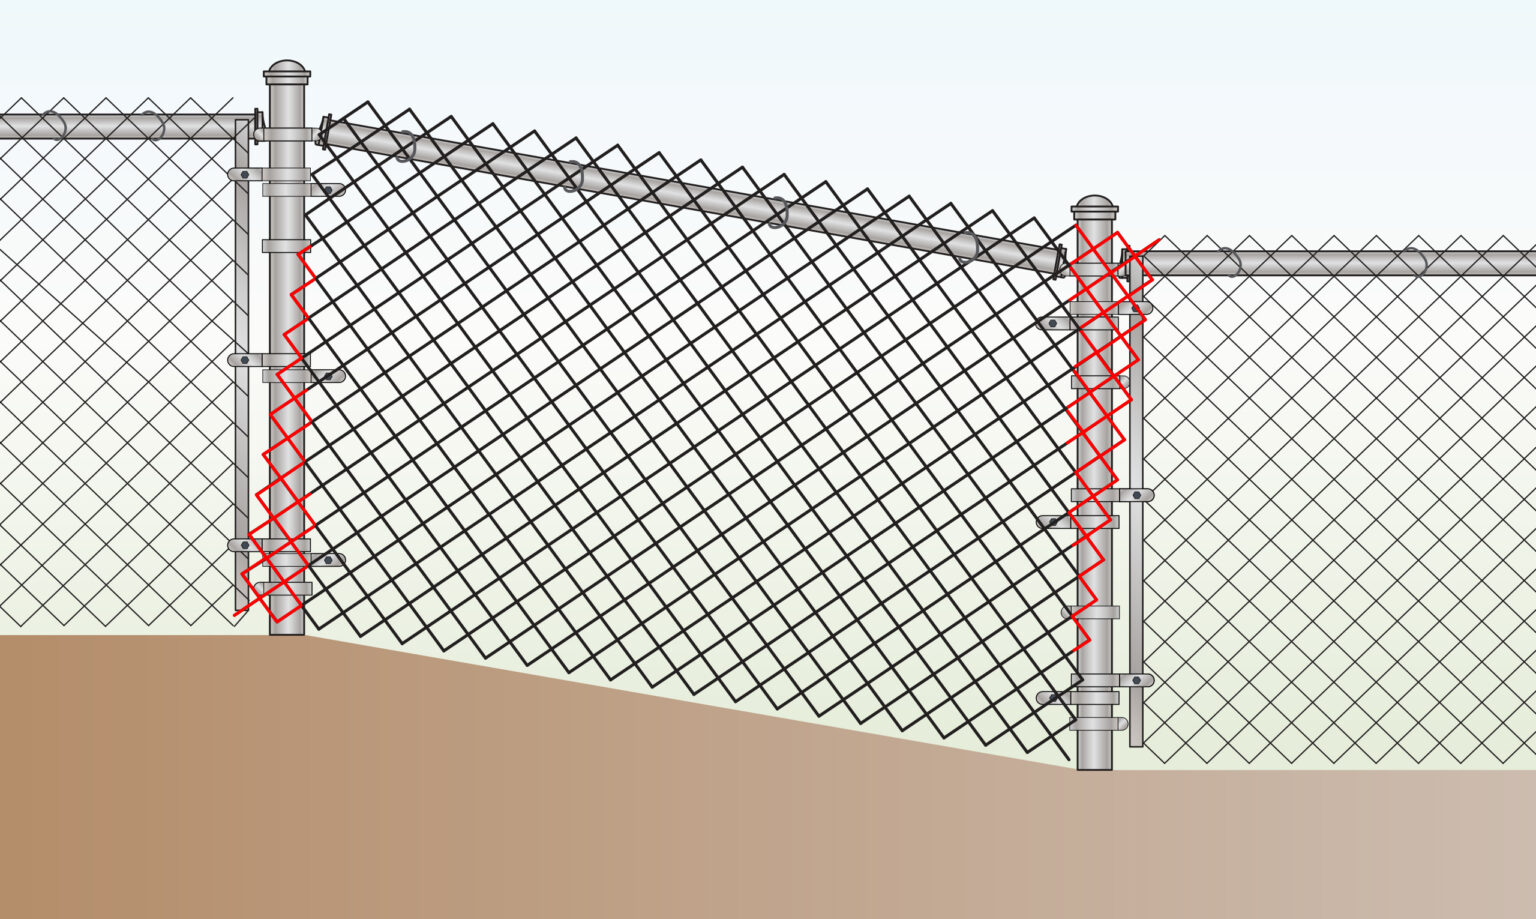
- It’s recommended to have help holding the mesh this process.
- When stretching chain link on a slope, a bias cut may be necessary at the ends where it connects to the terminal posts.
- Bias cuts involve trimming excess fabric by evenly cutting the weaves along the incline.
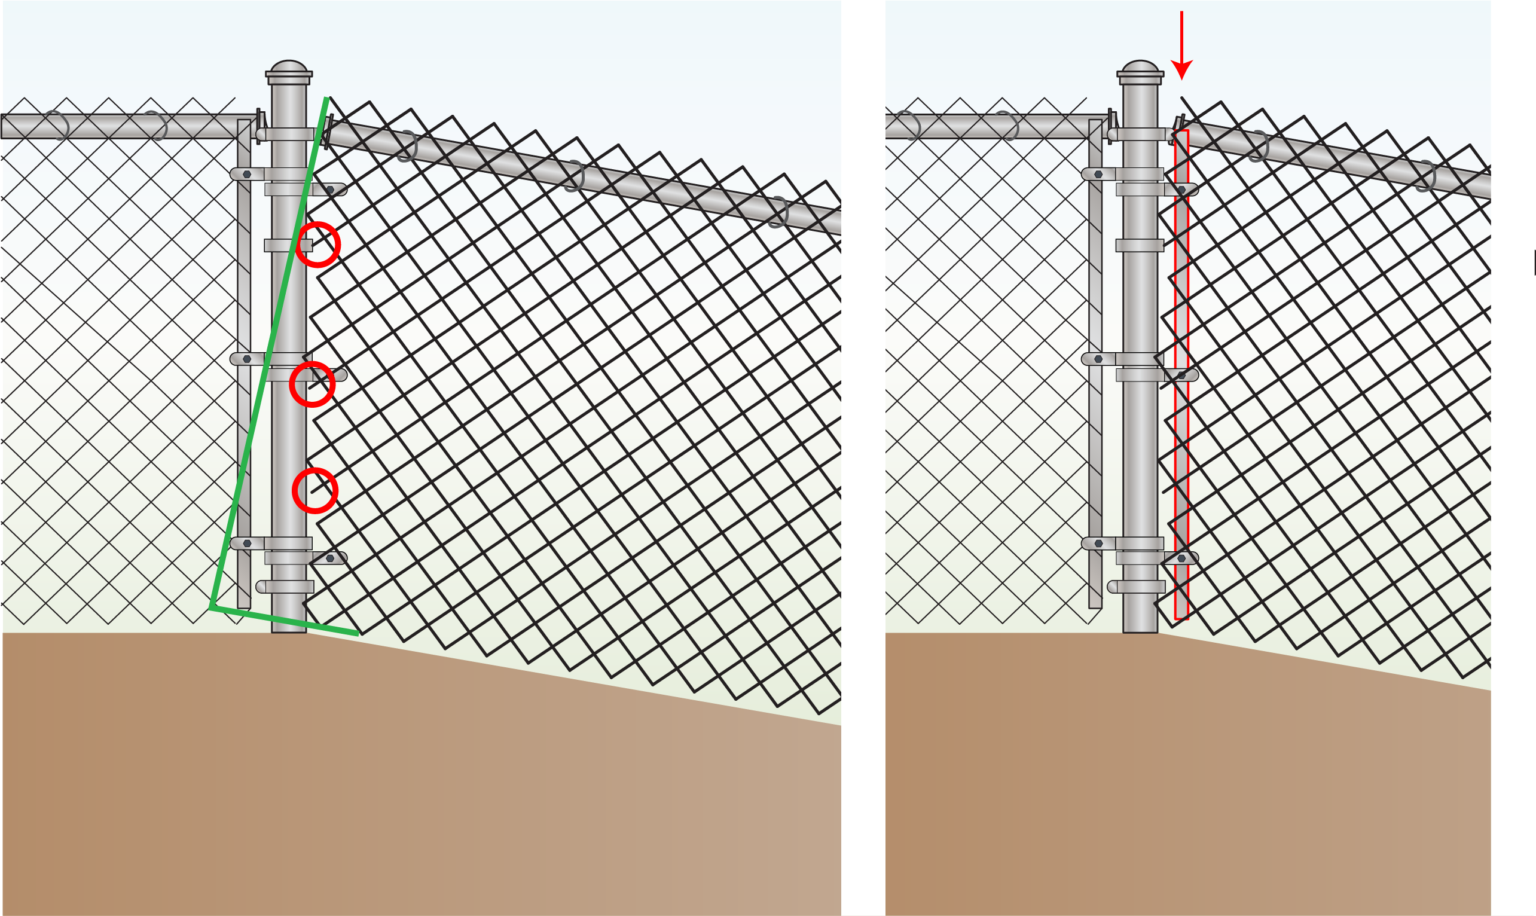
- Loosely secure the chain link to the top rail.
- Begin at one end and use bolt cutters to cut the excess wire.
- Then, slide the tension bar into the fabric, following the angle created by the bias cut.
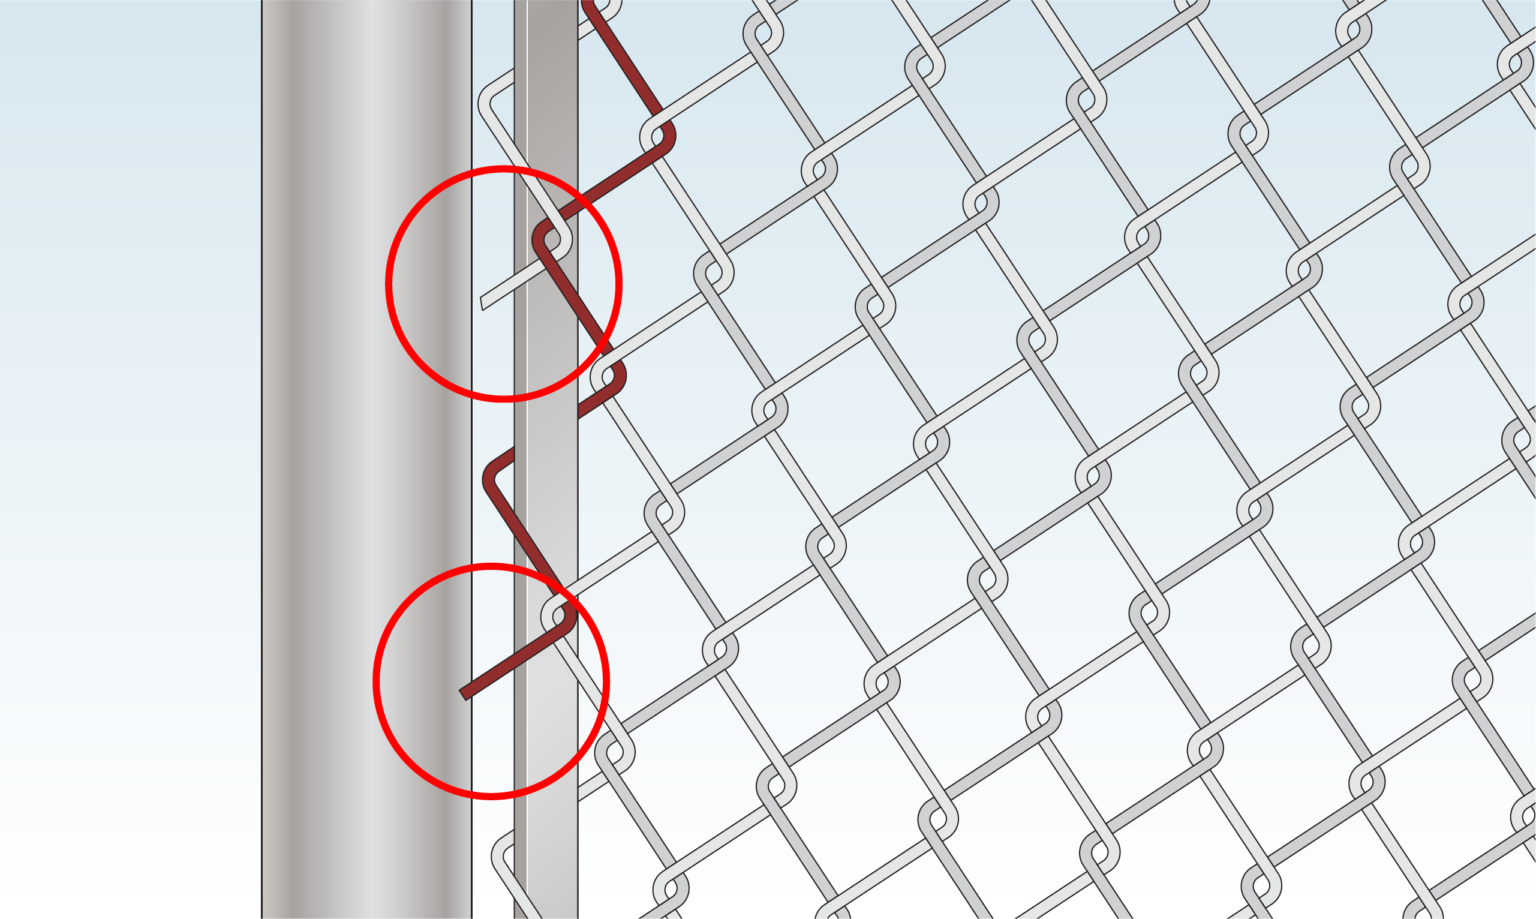
- The red circles highlight where the chain link has been cut to allow for the bias.
- When cutting the weaves, make the cut halfway through the diamond so that half of the diamond remains intact. In other words, avoid cutting too close to any bend in the weave.
- If necessary, repeat the process on the other side.
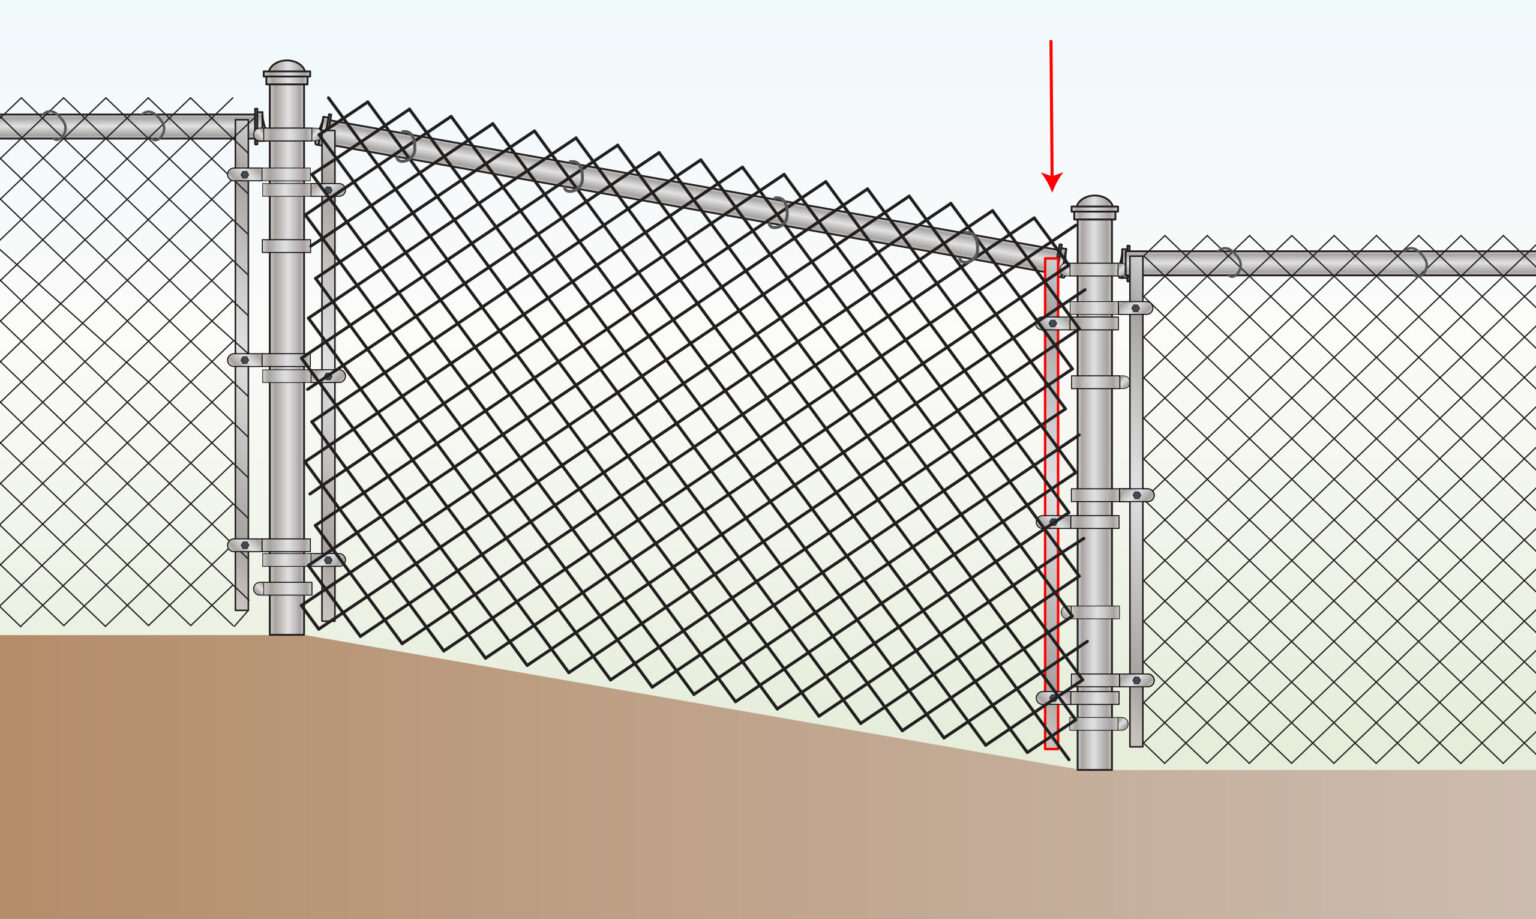
- To complete the process of how do you install chain link fence on uneven ground, slide the tension bar into the fabric, following the angle created by your bias cut.
Step 7) Optional: Weave Tensioning Wire
- To keep animals from getting under your mesh, weave tension wire through the bottom of the mesh along its length.
Tips, Tricks & Warnings
- In the process of how to install chain link fence on a slope, the stepped method is simpler but may leave gaps, while a contoured installation provides a seamless finish, though it requires more effort and precision.
- For detailed, step-by-step instructions, visit our chain link installation blog below.
- A bias cut is essential on sloping ground when using the contoured method to prevent loose ends.
- Complete the flat or horizontal sections of the barrier before addressing uneven areas for easier adjustments.
- Regularly check alignment and level as you set up posts, especially on uneven ground.
- Ensure posts are perfectly level before the concrete sets, as adjusting posts after the concrete hardens can be difficult.
- Since slopes may erode around posts over time, it’s important to periodically check and maintain the stability of the enclosure.
FURTHER READING
- How to Install a Chain Link Fence (Traditional) – Step by step instructions on how to install a fence.
- How to Make a Chain Link Gate – Learn how to make a gate.
- How to Unroll Chain Link Fence – A guide showing you unroll correctly a mesh.
- How to Cut Chain Link Fence – Step by step instructions on how to cut mesh using different methods.
- How to Connect Chain Link Fence – A guide showing you how to connect two mesh.
- How to Tighten Chain Link Fence – Learn how to tighten a mesh.

